Mercury Convertible Hot Rod Custom buyer's guide
Mercury Convertible Hot Rod Custom -- the model's own buyer's guide: variants, values and what to check.
Years listed: 1940-1940 · Series: Full Size
# Mercury Custom — Shopping Guide
Overview and history
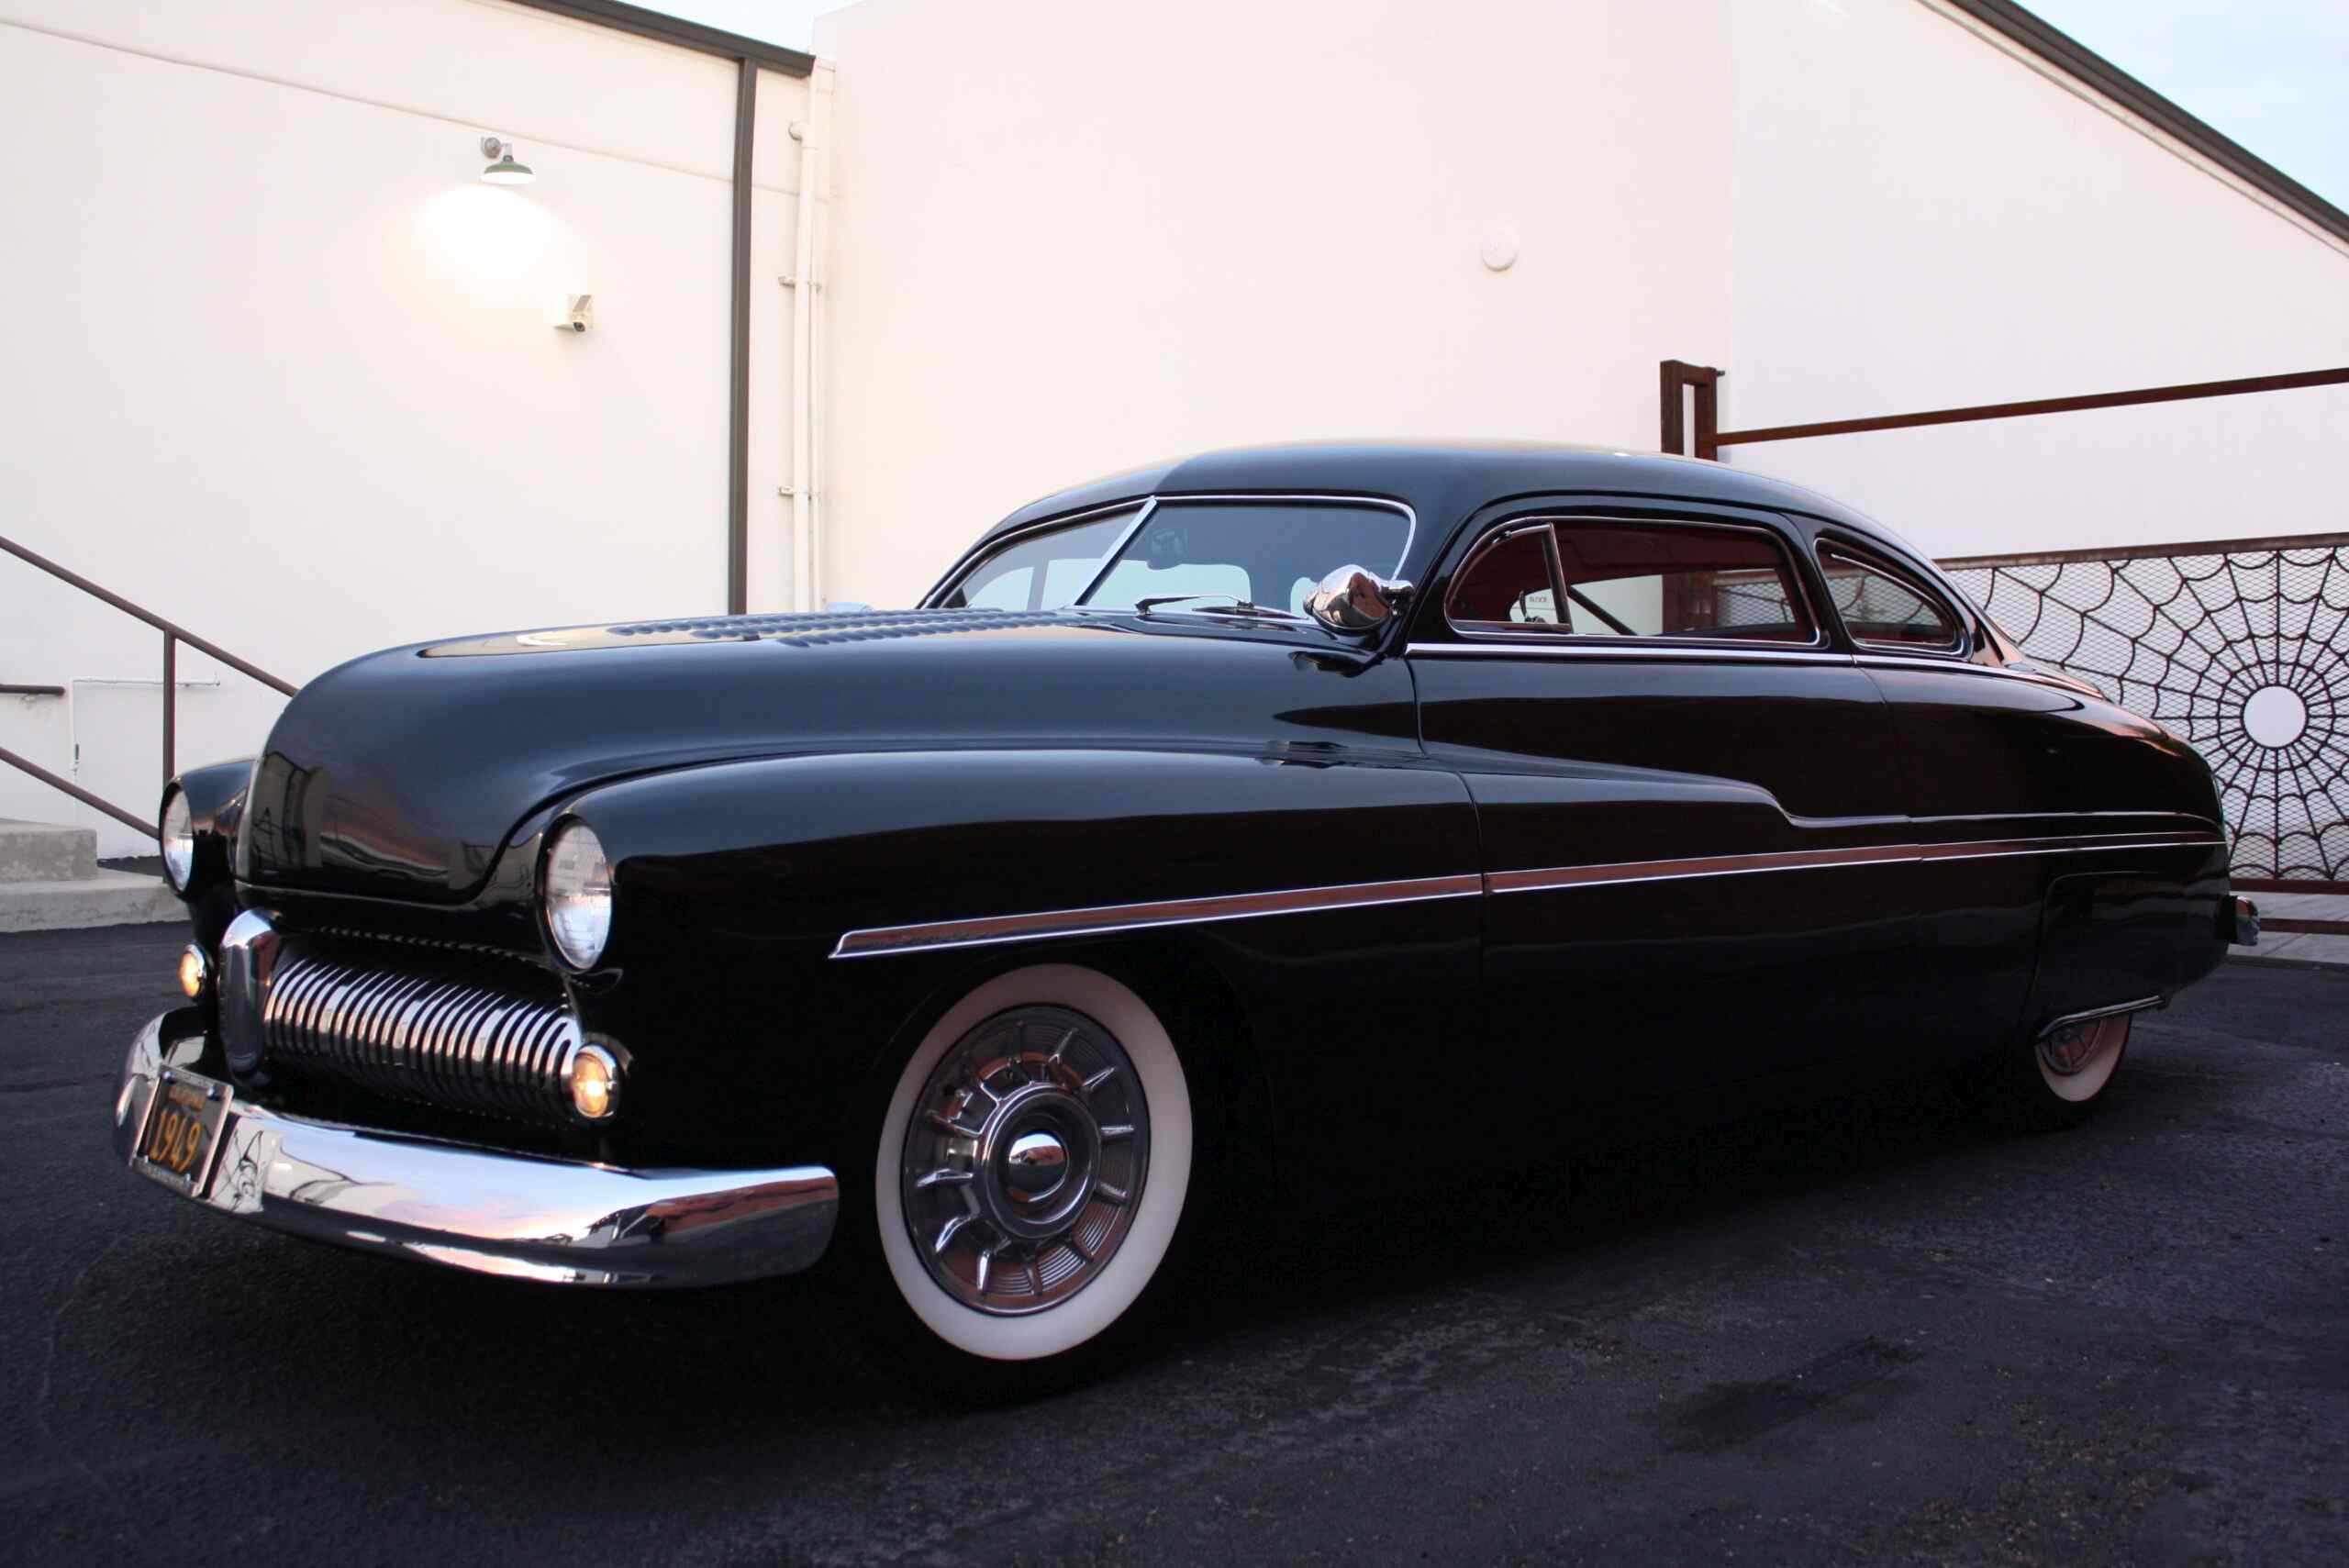
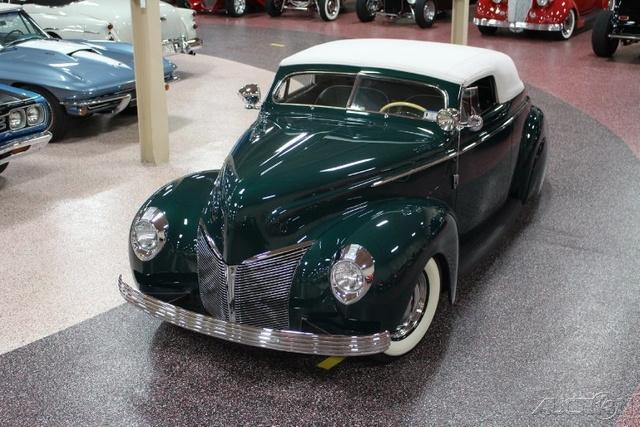
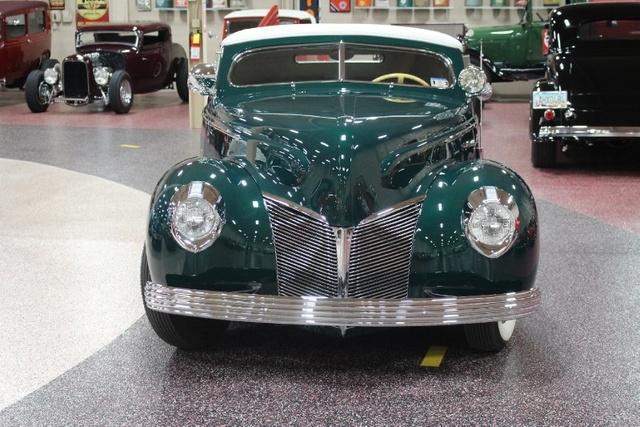
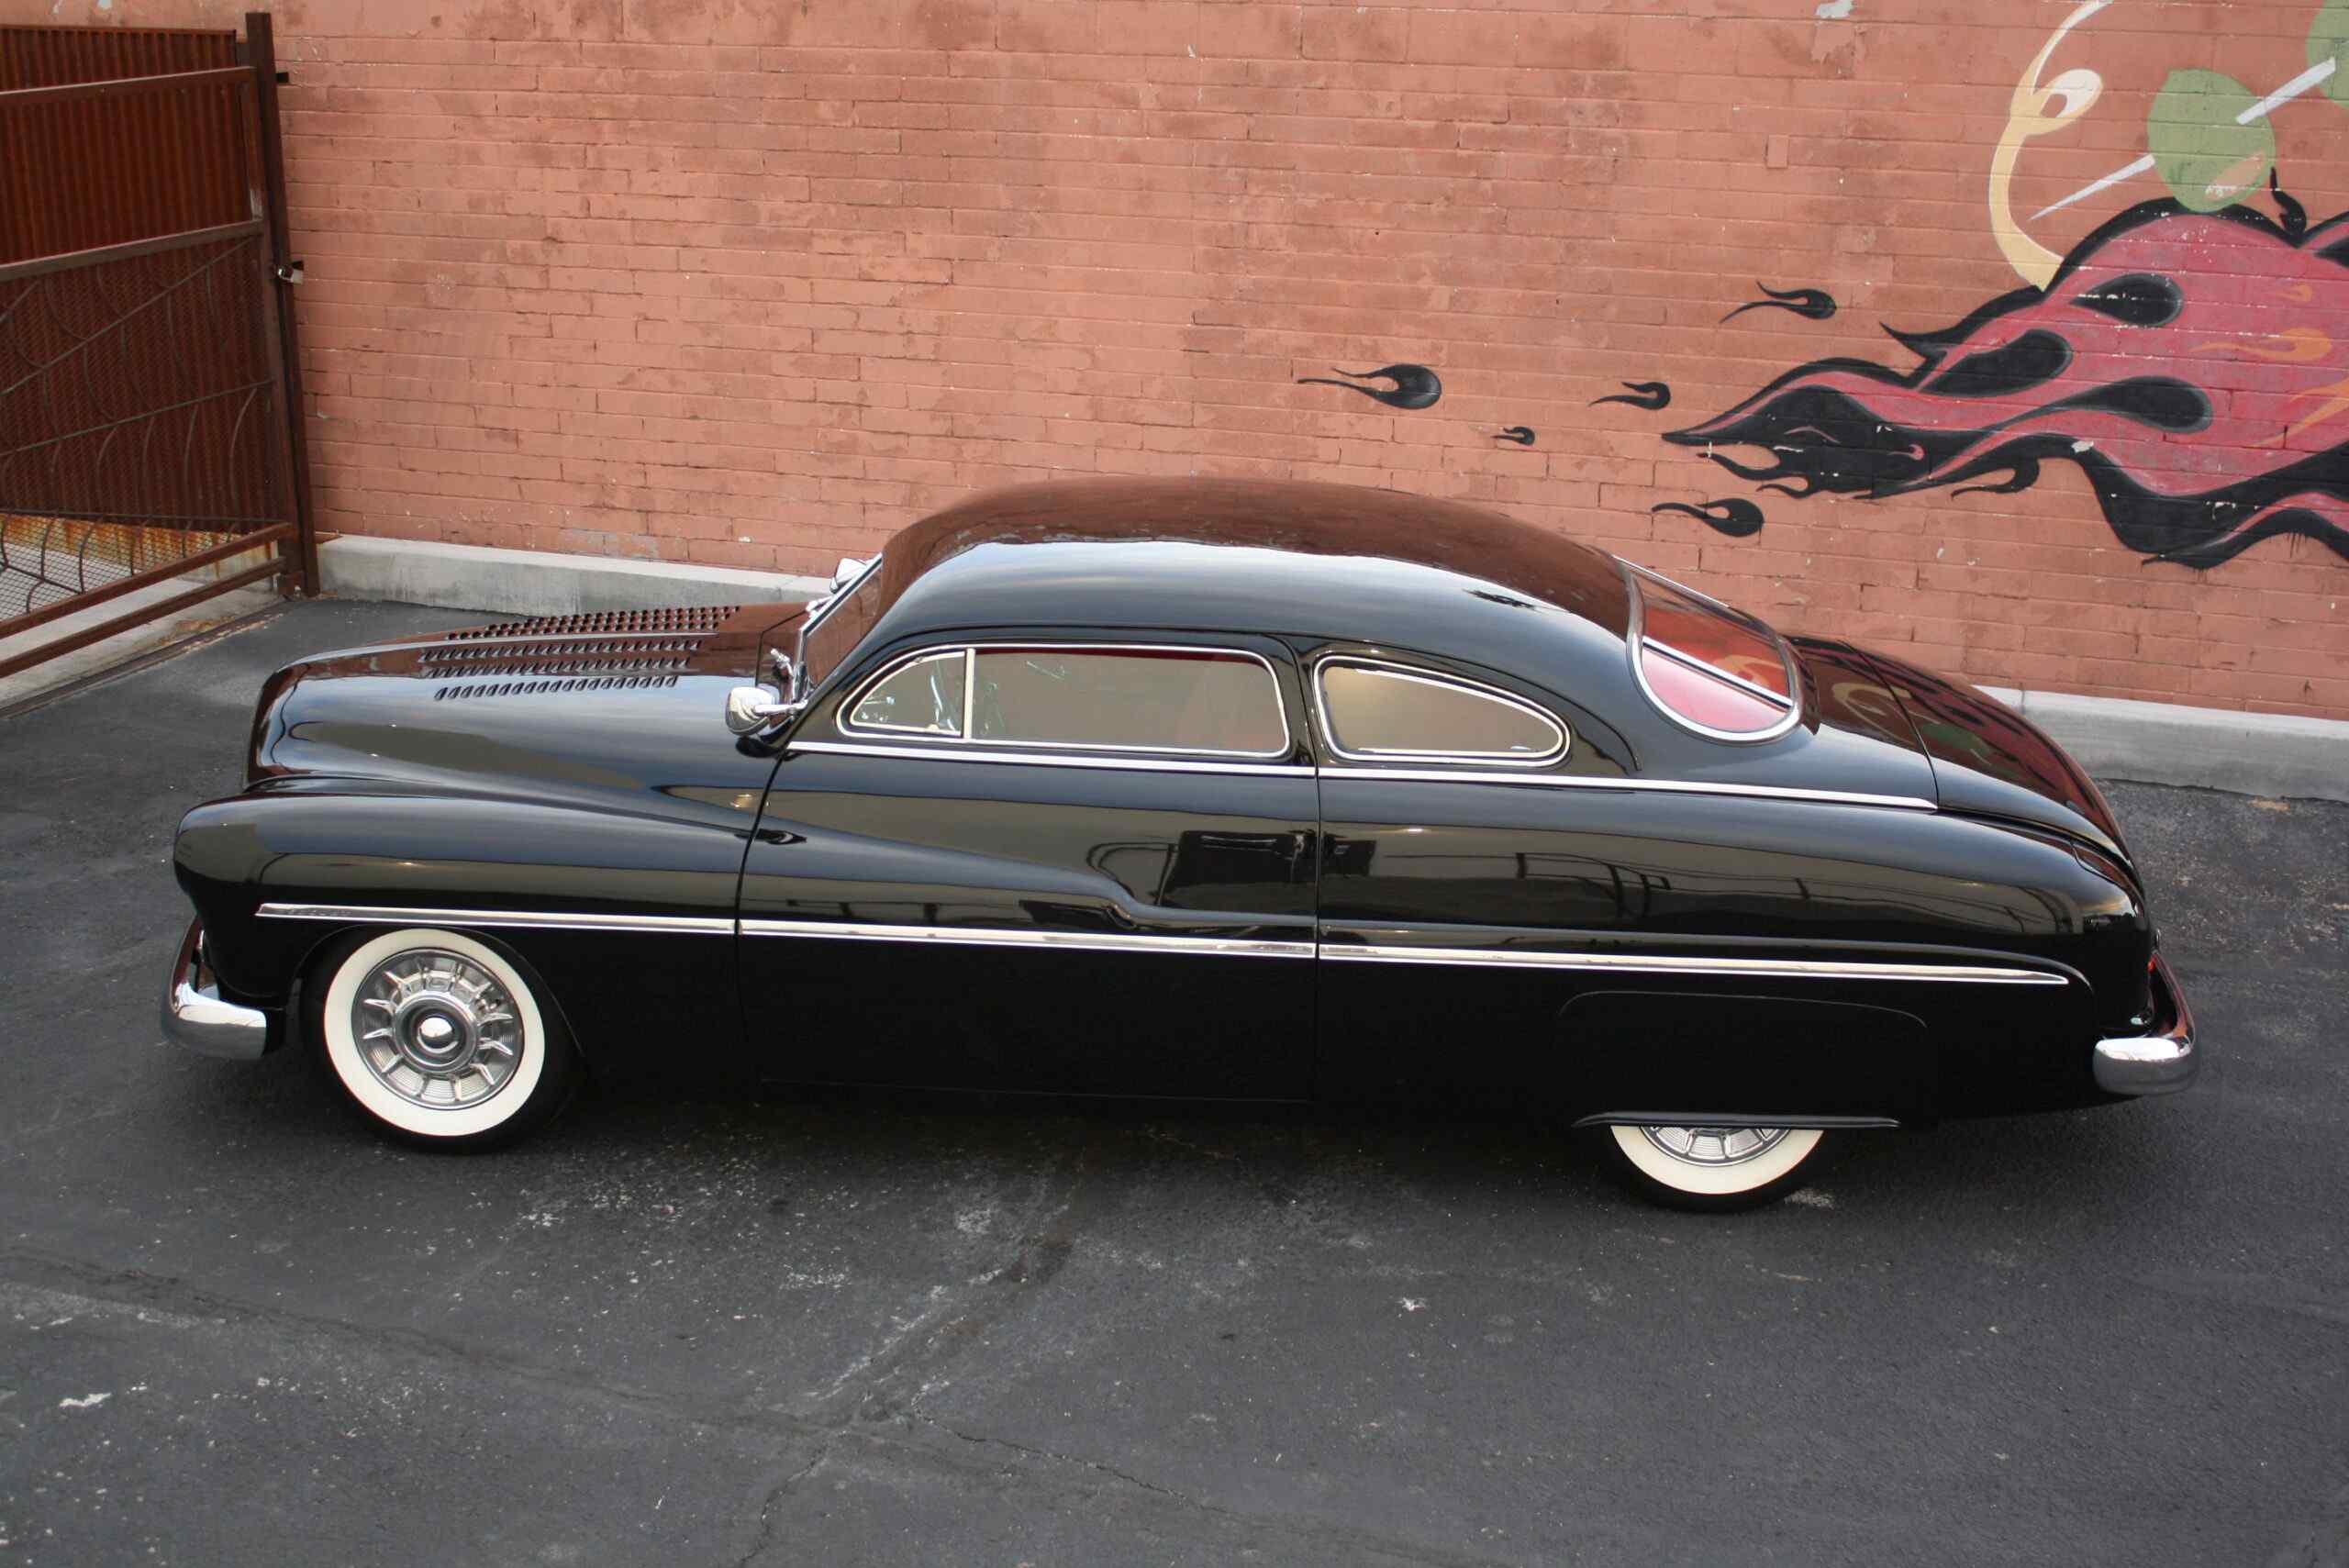
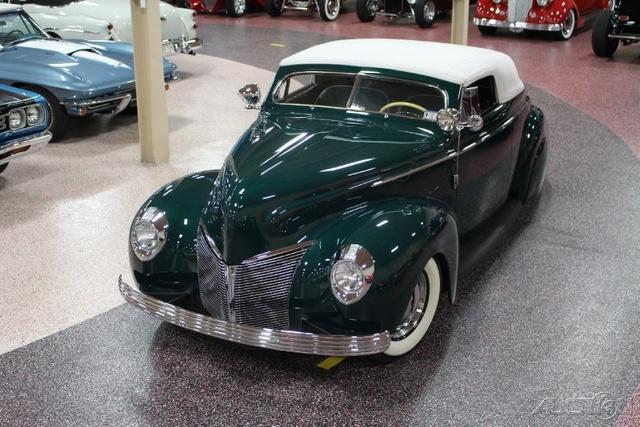
There is no such thing, in the factory sense, as a Mercury Custom — and understanding that is the first and most useful thing you can learn before you buy one. What the name describes, in almost every advertisement you will ever see, is a Mercury that has been customised: cut, lowered, smoothed and repainted by a builder rather than by the factory in Dearborn or Metuchen. The two cars that sit behind this guide on Classic Listings make the point perfectly. One is a 1940 Mercury convertible from St. Louis, Missouri, finished in deep green with a white top. The other is a 1949 Mercury coupé from Tucson, Arizona, finished in black, lowered, louvred and skirted. They are separated by a world war, by two entirely different generations of Mercury design and by two different schools of customising, yet the trade groups them under one word because the word describes the work, not the badge.
Mercury itself was created in 1938, largely at Edsel Ford's urging, to fill the wide price gap between a Ford V8 and a Lincoln-Zephyr. The first cars, launched for 1939 as the Mercury Eight, were more than dressed-up Fords, though they shared Ford's engineering bones: a 239 cubic inch flathead V8, a three-speed gearbox, transverse leaf springs and, from the start, hydraulic brakes. They were longer, wider and more substantial than a Ford, with a 116-inch wheelbase, and they were styled to look it. For 1940 the Eight received the facelift you see in the green convertible in this guide — sealed-beam headlamps faired into the front wings, a tall, narrow, vertically barred grille in two halves, and smoother, more integrated bodywork. These pre-war Mercurys were handsome, capable cars, but in period they were rarely customised as heavily as Fords. They were the more expensive, more respectable purchase, and respectable purchases tended to stay standard.
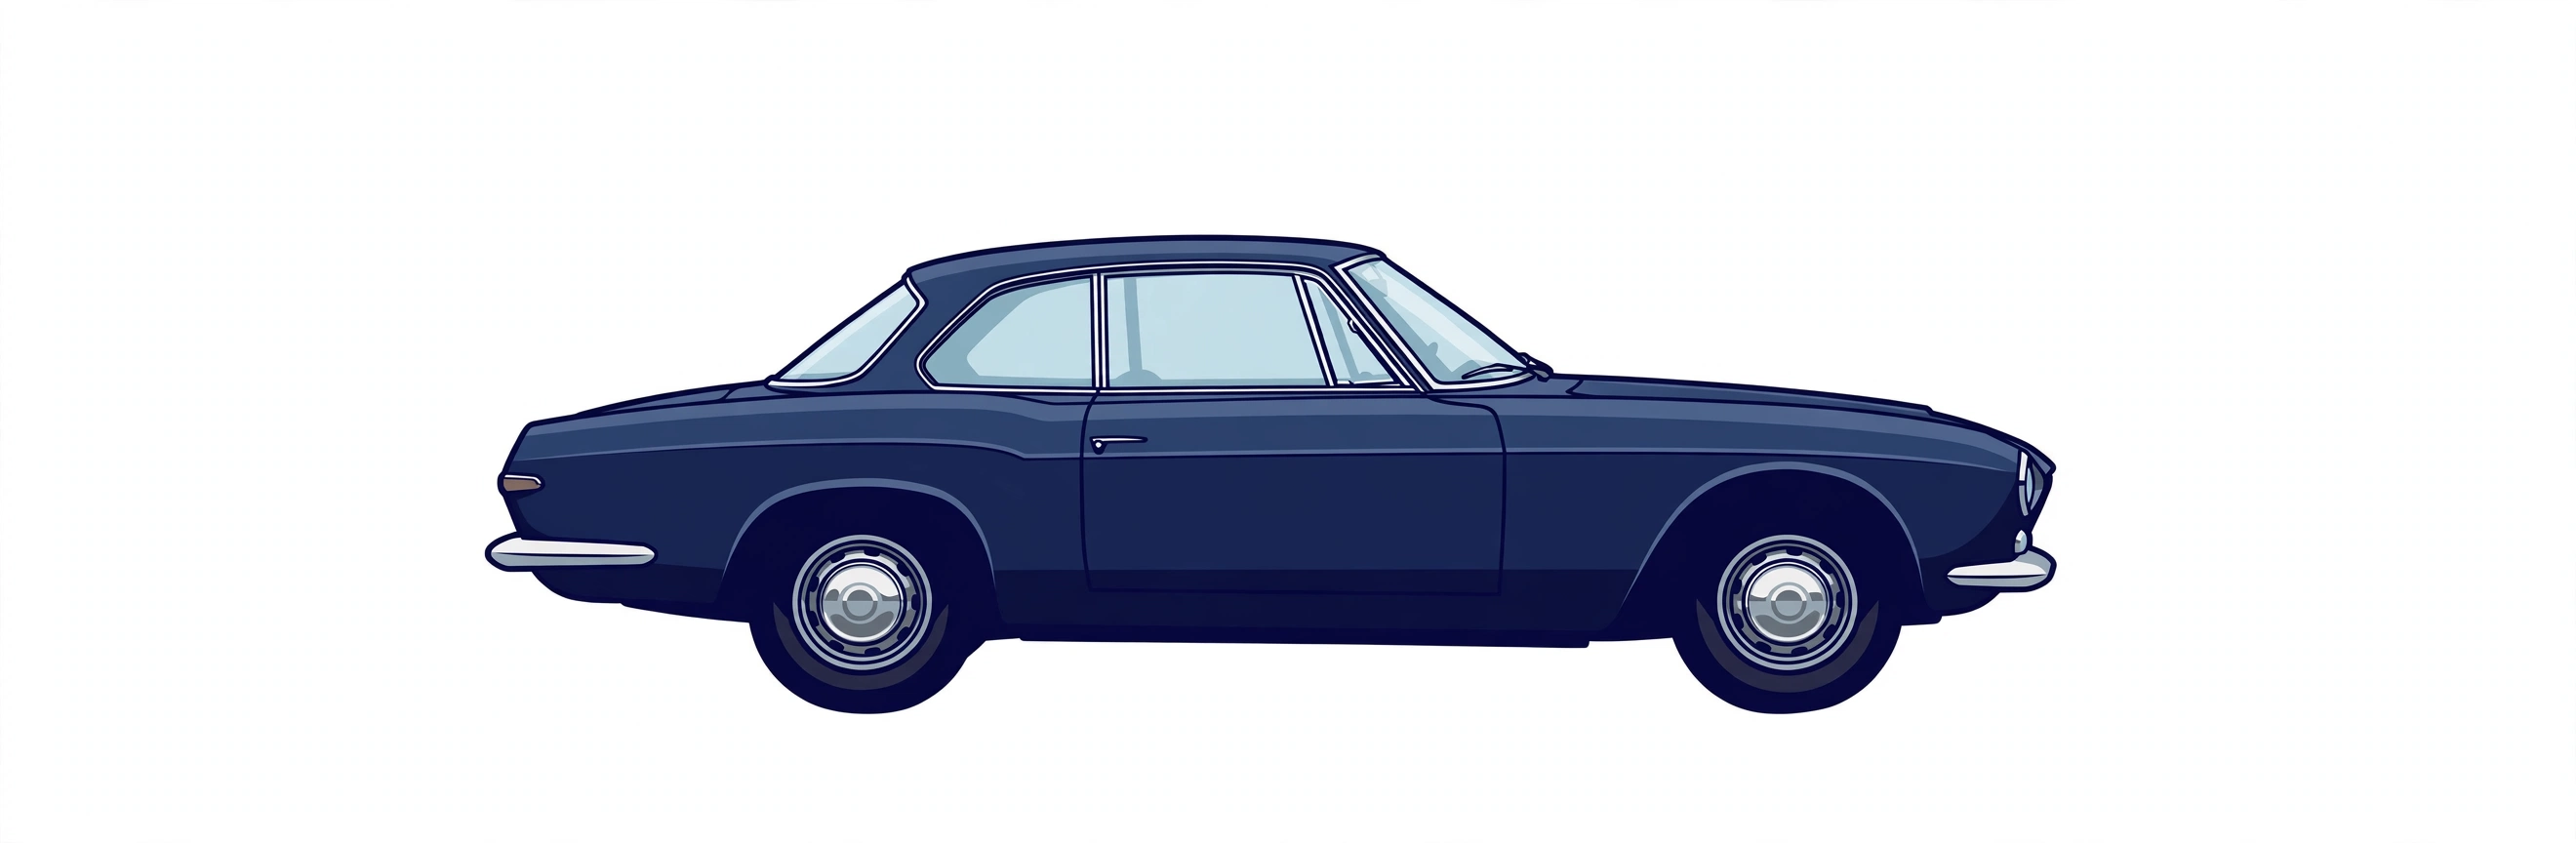
The second generation changed everything. Mercury's first all-new post-war car, launched for 1949, abandoned the separate-wing, running-board silhouette altogether. The 1949 Eight has a full-width, slab-sided body with the wings absorbed into the flanks, a low, wide grille, a curved windscreen and a fastback coupé profile that seems to flow in one gesture from roof to tail. Underneath it was equally new: independent front suspension with coil springs replaced the old beam axle and transverse leaf, the rear axle was located by semi-elliptic leaf springs and tubular shock absorbers, and the flathead V8 grew to 255 cubic inches by means of a longer-stroke crankshaft. It was bigger, quieter and more modern than any Ford, and — crucially — its body was an almost perfect blank canvas. The roof was tall enough to cut down. The flanks were plain enough to smooth. The grille opening was wide enough to accept almost anything. Within months, customisers in California were doing all three.
That is why the 1949 to 1951 Mercury became, and remains, the definitive lead sled. The term comes from the lead that early customisers used as body filler — melted, paddled onto a panel, filed and sanded to shape — after they had cut a roof down, welded in new pillars and removed every handle, badge and strip of trim that interrupted the line. Sam Barris's own 1949 Mercury, chopped soon after the model appeared, and the 1951 Mercury built by Barris Kustoms for Bob Hirohata — with its chopped top, extended rear wings, frenched headlamps and Buick side trim — established a vocabulary that builders have copied, varied and argued about ever since. A 1949 Mercury coupé also reached a far wider audience on film, driven by James Dean's character in Rebel Without a Cause. The car in the film is comparatively mild, but the association fixed the shape in the public imagination: long, low, dark and faintly menacing.
The models
Because “Custom” is a treatment rather than a model, the honest way to lay out the range is by the base cars that receive the treatment, and then by the style of build you are likely to meet. On Classic Listings the pool behind this guide is tiny — two cars in total, one for sale and one recorded as sold at the time the brief was drawn — so do not read it as a census of the market. One car is dated 1940 and the other 1949, both are filed under the Full Size series, and both come through dealers, in Missouri and Arizona respectively. That spread, accidental as it is, actually illustrates the market well: pre-war convertibles and post-war coupés are the two poles around which Mercury customising turns.
| Model (base car) | Years | Engine | Output | Built | Character |
|---|---|---|---|---|---|
| Mercury Eight convertible (Series 99A / 09A) | 1939–1940 | 239 cu in flathead V8 | 95 hp (period rating) | Not stated — do not trust unsourced totals | Upright pre-war styling, separate wings, folding hood; customised mildly, as a hot rod or boulevard convertible |
| Mercury Eight coupé and sedan (pre-war) | 1939–1942 | 239 cu in flathead V8 | 95 hp (period rating) | Not stated | The rarer custom base; more often restored than cut, so a cut example needs its history explained |
| Mercury Eight coupé (Six-Passenger / Sport Sedan family) | 1949–1951 | 255 cu in flathead V8 | 110 hp (period rating) | Not stated | The canonical lead sled; chopped, nosed and decked, flathead or early overhead-valve power |
| Mercury Eight convertible | 1949–1951 | 255 cu in flathead V8 | 110 hp (period rating) | Not stated | Scarcer and structurally softer than the coupé; custom versions often wear a chopped windscreen and a padded Carson top |
| Mercury Monterey coupé | 1950–1951 | 255 cu in flathead V8 | 110 hp (period rating) | Not stated | Upmarket hardtop-style coupé introduced as a premium trim; a desirable base, and one sellers sometimes claim for ordinary coupés — check the trim and data |
| Later Mercury custom / restomod builds | Various, on 1949–51 shells in the main | Swapped V8 — small-block Ford or Chevrolet, Cadillac, Oldsmobile Rocket, modern LS and others | Varies entirely with the swap | One-off, by definition | The silhouette preserved, the engineering replaced; value lives in documentation and execution, not originality |
The 1949–51 cars divide by year in ways a buyer should be able to spot. The 1949 car has the cleanest flanks and the grille that customisers most often replace anyway. For 1950 the trim and grille detailing changed modestly and the Monterey appeared as a premium coupé with a vinyl- or canvas-covered roof in period. For 1951 the rear wings grew more pronounced, the rear window treatment changed, and Mercury offered its first automatic gearbox, the Merc-O-Matic. None of this matters much once a car has been chopped and smoothed — the year distinctions are the first things the builder erases — which is precisely why you must verify the year from the serial number and title rather than from the styling. A “1949” with 1951 panels, or a “1951” titled as a 1949, is not necessarily a problem, but it is always a question.
Body style matters more than year. The coupé is the stiffest, lightest and most coherent sled: its roof chops well, its structure tolerates lowering, and its silhouette is the icon. The four-door sedan chops less happily — four doors mean four window frames to align after the roof moves — and a chopped sedan that shuts cleanly is evidence of careful work. The convertible starts with no roof structure at all, relies on its chassis and body bracing for stiffness, and in custom form often carries a fixed, padded Carson top in place of a folding hood. That top looks wonderful and removes weather protection, folding mechanism problems and rear visibility at a stroke; it also means you must check scuttle shake, door fit and floor strength more rigorously than on any coupé.
Engines and gearboxes
You will meet three broad kinds of power in a Mercury Custom: the original flathead V8, a period overhead-valve V8 fitted when the car was young or in a traditional rebuild, and a modern swapped V8 fitted to make the car faster, cooler-running and easier to live with. Each has its own inspection logic. Do not let a seller blur them together with the phrase “V8 powered” — make them name the engine, and then verify it yourself from the casting and the ancillaries in front of you.
The 239 and 255 flathead V8s
The flathead Ford V8 is a side-valve engine: the valves sit in the block, beside the cylinders, rather than in the cylinder heads, which are simple flat slabs — hence the name. The pre-war Mercury version displaces 239 cubic inches, with a bore of 3.1875 inches and a stroke of 3.75 inches, and was rated in period at 95 horsepower. The post-war Mercury version keeps the same bore but uses a 4-inch stroke crankshaft, giving 255 cubic inches and a period rating of 110 horsepower. That crankshaft is the heart of the engine's identity and its desirability; the 4-inch “Merc crank” was for decades the stroker crank of choice in Ford flathead hot rods, so a genuine Mercury engine in a Ford, or a Ford engine passed off as a Mercury, are both common sights. In a Mercury, check what you actually have: ask where the engine number is, what the seller believes the engine to be, and whether it is the car's original unit, a correct-type replacement or a later rebuild of unknown parentage. On a custom, originality of the block matters less than health — but it should still be priced honestly.
Induction on a standard car is by a single two-barrel carburettor — the Ford/Holley 94 family on earlier cars, and the Holley-built unit fitted to the 1949–51 cars, often referred to by its 885-series designation. Traditional customs frequently wear two or three two-barrel carburettors on an aftermarket inlet manifold — Edelbrock, Offenhauser and Navarro are the period names — or, less commonly, early fuel injection conversions that are now more liability than asset. Ignition on the pre-war engine is by the famous Ford distributor mounted at the front of the engine, driven from the camshaft, with the coil on top; post-war flatheads use a more conventional upright distributor at the front, the so-called Loadomatic system on Ford applications, in which advance is controlled by vacuum related to carburettor venturi and manifold signals rather than by centrifugal weights. That distinction matters when a car runs badly: a Loadomatic distributor matched to the wrong carburettor, or to a multi-carburettor manifold that gives it a confused vacuum signal, produces flat spots and overheating that owners blame on everything except the mismatch in front of them.
Cooling is the flathead's defining weakness, and on a custom it is amplified. The engine has two water pumps, one for each bank, mounted low at the front, and its exhaust passages run through the block, heating the coolant as a condition of the design. Add a lowered nose, a smaller replacement grille opening, an air-conditioning condenser in front of the radiator and a hot climate, and a marginal cooling system becomes an inadequate one. A healthy flathead in a well-sorted car can run reliably, but it has little reserve. Ask for a demonstration from cold, watch the temperature gauge — and, better, an infrared thermometer on the top hoses — through a full warm-up, a run at speed and a period idling in traffic. Uneven bank temperatures point to a pump, a thermostat, a blocked radiator core or, worst of all, a cracked block passing combustion pressure into the water jacket.
The other flathead failure that ends purchases is cracking. The block is prone to cracks between a valve seat and the adjacent cylinder bore, and in the exhaust-port region, often as a result of past overheating, frozen coolant or over-enthusiastic machining. Some cracks are repairable by pinning or stitching; many are not worth repairing in a car you do not yet own. You cannot see the critical areas with the heads on. What you can do is look for the symptoms — unexplained coolant loss, pressurised hoses soon after a cold start, bubbles in the header tank or radiator neck, milky oil, one bank running hot, a history of repeated head-gasket changes — and make a compression test and, ideally, a cooling-system pressure test a condition of purchase. Budget honestly if you still proceed: a full flathead rebuild by a specialist, with machining, new pistons, bearings, pumps and ancillaries, commonly falls in the $6,000–12,000 range depending on specification and region, and a cracked-block discovery can add an engine to that bill.
Period overhead-valve swaps: Cadillac, Oldsmobile and early Chrysler
From 1949 onwards, customisers who wanted more power had a new menu. Cadillac's 331 cubic inch overhead-valve V8 and Oldsmobile's 303 and later 324 Rocket V8s were the prestige swaps of the early 1950s, and Chrysler's early Hemi engines — 331 cubic inches in the first generation — followed soon after. A genuine period installation of one of these engines, documented and still healthy, is a feature of real interest. An undocumented one is simply an old engine of unknown mileage in a car it was not designed for.
Modern swaps: small-blocks, big-blocks and the LS family
Your inspection is therefore mostly an installation audit. The engine should sit level, on manufactured mounts, with clearance you can get a finger into between sump and crossmember, manifolds and chassis, and fan and radiator. The cooling package should be proportionate — a modern aluminium radiator with an electric fan and a proper shroud or a well-designed mechanical fan, not a stock 1949 radiator asked to cool twice the power. The fuel system should match the engine: a carburetted small-block wants a regulated low-pressure supply in the region of 5–7 psi at the carburettor; an injected LS wants a high-pressure pump, a return or a properly engineered returnless system, filtered and safely routed, with the tank vented and the lines kept away from heat. The wiring should be loomed, fused and routed, with the electronic control unit for an injected engine mounted dry and accessible. The exhaust should clear the ground at the car's ride height — on a lowered sled this is not a given — and should not run hard against the floor or the fuel lines.
Gearboxes
The standard Mercury gearbox in both generations is a three-speed manual with synchromesh on second and top, operated by a column change on the 1940 and post-war cars. It is a pleasant, slow, deliberate gearbox that suits the flathead's torque. Its weaknesses are worn synchromesh on second, jumping out of gear on the overrun, worn selectors that make the column change vague to the point of guesswork, and oil leaks that owners treat as standard. A Borg-Warner overdrive, engaged by a dashboard control and a kickdown switch, was the desirable period option on post-war cars and transforms cruising; check that it engages, that it freewheels and locks as it should, and that the relay, solenoid and governor wiring survive. An overdrive that does not work can be a simple electrical fault or a worn unit — price the uncertainty, and expect $600–1,500 for specialist attention depending on what is found.
Automatic cars divide by era. The Merc-O-Matic, offered from 1951, is a three-speed automatic of Ford design; it is smooth when healthy and expensive when not, with a full rebuild commonly in the $2,500–4,500 range. Swapped cars usually carry the donor's automatic: the two-speed Powerglide, the three-speed Turbo Hydra-Matic 350 or 400, the overdrive 700R4 or 4L60 family behind Chevrolet engines, or Ford's C4, C6 and AOD behind Ford engines. Each is a known quantity in its own world; your concern is the marriage — the flexplate and torque converter matching, the kickdown or throttle-valve cable adjustment (a misadjusted throttle-valve cable will destroy a 700R4 or AOD in short order), the cooler lines and whether an external cooler is fitted, and the gearing of the rear axle. A modern overdrive automatic behind a sensibly geared axle is the combination that makes a sled a genuine long-distance car. A high-stall converter and very low axle gearing in the same car tells you it was built for a different purpose than the seller may be describing.
Problem areas
A Mercury Custom fails in two layers. The bottom layer is an old Mercury: rust, worn suspension, tired brakes and a flathead or an old V8 at the end of its patience. The top layer is the custom work itself: cut roofs, filled seams, substituted grilles, lowered suspension and rewired electrics. Trouble lives most expensively where the layers meet — where a chop was welded to a rusty pillar, where filler was laid over corrosion, where a lowered car bottoms its exhaust on a floor that was never repaired. Work through the car in that order: structure first, custom work second, mechanicals third, cosmetics last. Our own photo-note evidence for this model is too thin to generalise from — of the cars behind this guide, only one carries an examined photo note, and that note mentions both rust and damage — so treat that as a prompt to look, not as a statistic. You must do the looking yourself, on the specific car.
Rust and structure: the map
Start underneath, on a lift if you can possibly arrange one, with a torch and a screwdriver you are prepared to use gently on suspect seams. On both generations the chassis frame itself is comparatively sturdy, but check the side rails around the spring hangers, the crossmembers under the floor, and any area where a previous repair plate has been welded — a plate can be a proper repair or a lid on a hollow rail. On the post-war car, examine the front crossmember and the areas around the independent front suspension mountings; corrosion or cracking here affects geometry as well as strength.
The body rust map is predictable. Sills and rocker panels rot from the inside, fed by blocked drain holes and by mud trapped behind the front wheels; on a custom, they are also the panels most likely to have been extended, reshaped or filled to blend a lowered stance, so tap along their length and listen for the change in note between steel and filler. Floor pans go first under the front footwells, under the rear seat and in the boot floor around the spare-wheel well and the fuel tank. Door bottoms fill with water when their drain slots block, and rust out along the lower skin and the inner frame — a door that looks perfect outside and bubbles along its lower edge is showing you the beginning, not the end. Front and rear wing lower edges, the headlamp surrounds, the bonnet edges and the boot lid gutter all trap water. On the pre-war convertible, add the scuttle and cowl sides, the windscreen frame, the hood well and the bracing around the door apertures: a convertible body flexes, works its seams and admits water in places a coupé never does.
Rust repair on these cars is skilled, slow work because so much of the shape is curved and because a custom's panels may no longer match any pressing you can buy. A sill or rocker replacement properly done, per side, commonly runs $1,000–2,500 in welding and fabrication before paint; floor sections and boot floors are in a similar range per area; a roof or pillar repair that involves cutting out failed filler and re-making the chop joint can exceed $3,000–5,000 a side once paint blending is included. Those figures are why a magnet, a paint-depth gauge and a lift are worth more than any assurance. A thin skim of filler over sound, shaped metal is normal custom practice. Filler measured in quarter-inches over rust is a deferred bill with your name on it.
The custom work: chops, filler, seams and substituted parts
Judge a chop by its consequences, not by its drama. Sit in the car. Your eye line should clear the top of the windscreen with the seat in its normal position; the wipers should sweep the area you actually look through; the side glass should rise and fall without binding and should meet its seals at the top; the door glass frames, if retained, should align with the roof apertures on both sides equally. Get out and sight along the roof from front and rear: the crown should be even, without a step at the weld line or a hollow on one side. Sight down each flank: a good build flows, a poor one has a visible change of direction at the B-pillar or a rear quarter that was extended to meet a roof that moved further than the builder expected. Open and close every door, twice. A chopped car whose doors need lifting to latch has either sagged, was welded out of alignment, or has worn hinges the chop has exposed — all three are expensive in different ways.
Filler deserves a paragraph of myth correction. The myth is that “real” lead sleds contain only lead and that any plastic filler is fraud. In truth, period builders used lead because it was what they had; lead is heavy, difficult, hazardous to work and prone to cracking if laid thick over a flexing joint, and many celebrated period cars have had their lead repaired or replaced in later restorations. Modern polyester and epoxy fillers, used thinly over properly welded and shaped metal, are entirely respectable. What condemns a car is not the material but the thickness and what lies beneath it. Carry a soft magnet wrapped in cloth — it will hold through paint and a thin skim, and fall or weaken over thick filler — and a paint-depth gauge if you can borrow one. Work a grid over the roof joints, the filled seams where badges and handles were removed, the extended rear quarters and the areas around frenched headlamps and tail lamps. Readings that climb sharply in exactly those places are expected; readings that stay high across whole panels are not.
Nosing and decking — removing bonnet and boot trim and welding the holes — and shaving door handles create a dependency buyers forget: if there is no handle, entry depends on an electric solenoid, a cable release or a hidden mechanical button. Test every method, then test the backup method, then ask what happens with a flat battery. A car you cannot enter without power, with no mechanical backup, will one day make the point for you in a car park. Similarly, frenched headlamps and tail lamps — set into tunnels welded to the wing — trap water behind them if the tunnel is not drained and sealed; look for rust staining below the lamps and for condensation inside the lenses. Substituted grilles, most famously the toothy DeSoto grilles and various Lincoln and Packard items, are only as good as their mountings and the panel work that blends them into a different car's opening. Check from behind, inside the engine bay or through the grille itself, for brackets, filler and daylight.
Lowering is the other universal modification, and it is done well or badly with nothing in between. Period methods — cut front coils on the post-war car, lowering blocks at the rear, de-arched or reversed-eye leaf springs, dropped axles on pre-war cars — are simple and, within limits, effective. Modern methods add dropped spindles, air suspension with bags in place of coils or in addition to leaves, and chassis “C-notches” to clear the rear axle. Each step down reduces suspension travel, so ask how the car rides and, on the test drive, find a rough surface. A car that crashes onto its bump stops, scrapes its sump or exhaust on moderate undulations, or steers differently after a bump has geometry problems, not character. With air suspension, run the system through its full range, listen to the compressor, time how long it takes to rise, leave the car at ride height while you inspect the rest and check whether it has sunk on one corner, and ask where the bags, valves and lines came from and whether spares are standard sizes. A failed bag or valve is a $300–900 parts-and-labour event per corner in most cases; a badly designed installation that must be re-engineered costs far more.
Suspension, steering and brakes
On the pre-war car the suspension is Ford practice of the period: a beam front axle on a transverse leaf spring, a live rear axle on another transverse leaf, lever-arm shock absorbers and mechanical-feeling steering through a worm-and-roller box. Wear appears as play at the kingpins, sagging and cracked spring leaves, perished shackle bushes and shock absorbers that no longer damp. Lift the front, grip each wheel at top and bottom and rock it; movement at the kingpin is a rebuild, not an adjustment. On the post-war car the independent front end uses coil springs, unequal-length wishbones and an anti-roll bar, with a live axle on semi-elliptic leaves at the rear. Its wear points are ball joints or kingpins according to specification, wishbone bushes, coil spring seats and the steering idler. In both cases, custom lowering changes the baseline: a car that sits three inches low has already used much of its travel and may have had its steering geometry — castor, camber and toe — set by eye. Uneven front tyre wear on a custom is rarely an accident; it is a measurement the previous owner left for you.
Brakes on both generations are drums all round, hydraulically operated, single-circuit on the standard cars. They were adequate in period and they are the first system a modern driver finds wanting, especially in a heavier, faster swapped car. Check the pedal for height, hardness and sink — a pedal that creeps down under sustained pressure is passing fluid somewhere, internally in the master cylinder or externally at a wheel cylinder or hose. Pull a front and a rear drum if the seller permits, or at least inspect through the backing plates and look for fluid contamination of the linings. Disc conversions are common and welcome, but check them as conversions: correct master cylinder and proportioning, a servo if one is claimed, hoses that do not foul on full lock, and a handbrake that actually holds — many disc conversions leave the car with a token parking brake. A thorough drum overhaul with cylinders, linings, hoses and machining commonly runs $800–1,800; a properly engineered disc conversion, $1,500–3,500 depending on specification. Do not accept “it stops fine” from the passenger seat. Drive it, brake firmly from speed in a safe place, and feel whether it pulls, fades or needs a second application to build pressure.
Interior, glass, top and electrics
Glass on a chopped car is a specialist item. The windscreen was cut down or replaced, side glass was cut to new templates, and the rear window may come from a different model entirely. Laminated glass can be cut; toughened glass cannot — it must be made to size — so ask what each pane is and whether the builder kept templates. A replacement windscreen for a chopped car is not an order-from-stock item; budget $600–1,500 for custom glass work if a screen is cracked, delaminating or badly scratched, and more if the aperture itself needs correction. Window regulators, channels and seals on a chop work at angles the factory never intended, so operate every window slowly and watch for glass tipping, binding or dropping.
On convertibles, the top is a system, not a piece of cloth. A folding hood should rise and fall without heroic effort, latch evenly at the windscreen header, seal at the side rails and sit flat when down. A Carson-style padded top is a rigid or semi-rigid removable shell trimmed to look like a folded hood: check its fixings, its seals, how many people it takes to remove it, and where you are expected to store it. Replacement of a folding hood in quality material, with fitting, commonly runs $1,500–3,500; a bespoke padded top costs more and takes longer. Either way, a car photographed only with the top up may be hiding a frame fault, and a car photographed only with it down may be hiding the top.
Electrics begin with a question: is the car still 6-volt, positive-earth, with a generator, or has it been converted to 12-volt, negative-earth, with an alternator? Both can work. The half-converted car is the problem — a 12-volt starter on 6-volt cabling, a modern radio or solenoid system fed through original wiring, an electric fan drawing more than the generator can supply. Look at the battery, the main cables and the earth straps first; customs often relocate the battery to the boot for a clean engine bay, which adds cable length, voltage drop and the need for proper venting and securing. Then work every electrical item methodically: lamps, indicators, horn, wipers, heater fan, gauges, interior lights, door solenoids, power windows if fitted, air suspension controls. Fuel gauges on converted cars are frequent liars because sender and gauge resistances no longer match. Wipers on a chopped car sweep a cut screen with shortened arms and blades — test them wet if you can. A full rewire with a modern loom, properly routed and fused, is $1,500–3,500 in parts and labour through a specialist; chasing individual faults in a mixed-voltage car can consume the same money in smaller, more irritating instalments.
How to inspect one
Inspect a Mercury Custom in a fixed order, and do not let the seller's enthusiasm — or the paint — rearrange it for you. Take a torch, a soft magnet wrapped in cloth, a paint-depth gauge if you can borrow one, a tyre tread gauge, a notebook and a friend who will operate switches and pedals while you watch. Ask in advance for a cold start, for access underneath or to a lift, and for the documentation file. A seller who refuses all three is giving you information; record it and price accordingly. The steps below cross-refer deliberately to the problem areas above, because on a custom the inspection is the problem areas, performed in person.
- Start with identity, before you fall for the car. Match the title to the serial number on the car itself — ask the seller to show you the stamping rather than reciting it — and confirm the year, because, as the models section explains, a chopped and smoothed car has had its year distinctions erased. Confirm the engine is what the advertisement claims: flathead, period overhead-valve or modern swap, and in what displacement. Write down casting details and take photographs. If the numbers do not match the paperwork, stop and resolve that first; no condition of paint cures a title problem.
- Walk the silhouette with your eyes, then with the magnet. Stand back and sight down each flank and along the roof, looking for the change of direction at a chop joint, a hollow in an extended quarter or a door that sits proud. Then work the magnet and, if you have one, the depth gauge over the roof pillars, the filled handle and badge holes, the extended rear quarters and the areas around the frenched lamps — the filler map from the problem areas section, done systematically. Note where readings climb, and distinguish a local skim over a weld from a whole panel reading high.
- Do the underside before the topside. On a lift or over a pit, work front to back: front crossmember and suspension mountings, frame rails at the spring hangers, sill inners, floor pans, boot floor, rear crossmember and any repair plates. Poke suspect seams gently. Look at the exhaust's lowest point, the sump and the fuel and brake lines, because on a lowered car these are the components that meet the road. Check for a chassis C-notch if the car is very low, and judge its welding as you would any structural weld.
- Test every door, window and entry method as a system. Open and close each door twice, watching for lift-to-latch sag. Raise and lower every window slowly. If handles are shaved, operate the solenoids, the hidden buttons and the mechanical backup, in that order, and ask the flat-battery question from the problem areas section and make the seller demonstrate the answer. On a convertible, raise and lower the hood, or remove and refit the Carson top with the seller's help, and count the people and minutes it needs.
- Sit in the car and check the chop from the inside. With the seat where you would drive, check your eye line against the windscreen top, the wiper sweep against your view, headroom, and whether the rear window gives you a usable view or a letterbox. Operate the mirrors — customs often wear small, decorative mirrors in positions chosen for looks. Adjust the seat through its travel and confirm the mountings feel solid when you brace against the pedals.
- Cold-start the engine yourself. From cold, a carburetted flathead or early V8 should need its choke or a couple of throttle pumps and then settle; a modern injected swap should start unaided and idle evenly. Listen for bearing rumble that fades as oil pressure rises, for exhaust blowing at the manifolds, and for fan or belt noise. Watch for smoke: blue on start-up suggests valve guides or seals, blue under load suggests rings or bores, white that persists suggests coolant. Note the oil pressure and temperature as it warms, using the cooling checks from the engines section — both banks even, no early pressurisation of the hoses, no bubbles at the radiator neck.
- Run the static mechanical checks. With the engine warm, check oil level and condition, coolant level and condition, and look under the oil filler cap for emulsion. Have your friend hold the brakes while you inspect for leaks at hoses and backing plates, and press the pedal hard and hold it to test for sink. Rock each front wheel at top and bottom for kingpin or ball-joint play, and at the sides for steering and bearing play. Bounce each corner and watch the damping.
- Audit the custom systems one by one. If the car has air suspension, cycle it fully, time the rise, listen to the compressor and leave it at ride height to check for a sinking corner later. If it has air conditioning, run it cold and check the compressor clutch, the condenser fan and the idle behaviour. Work every electrical item on the list from the electrics section — lamps, indicators, horn, wipers, heater, gauges, solenoids, windows — and confirm whether the car is 6-volt or 12-volt and whether everything agrees with that answer.
- Drive it far enough to learn something. Twenty minutes minimum, including a hill, a rough surface, a firm stop from speed in a safe place and, if possible, a few minutes in traffic to test cooling and idle. Work through every gear, including overdrive or the automatic's kickdown. Feel for the steering's dead band, for brake pull or fade, for axle whine and gearbox backlash on a trailing throttle, and for bump-stop crashes or grounding over undulations. A car that is only offered for a five-minute circuit of the block is being sold on a five-minute standard.
- Repeat the hot checks immediately after the drive. Park, leave the engine idling and watch the temperature; a flathead that climbs steadily at idle after a run has the cooling margin problem described in the engines section. Switch off, wait two minutes and restart — hot starting exposes vapour lock, heat-soaked starters and tired batteries. Check again for the air-suspension corner you left at ride height, for new leaks under the car, and for brake pedal feel while the system is hot.
- Read the documentation as evidence, not as decoration. A good file has a build book or dated photographs of the metalwork in progress — roof cut, welds dressed, panels in bare metal — plus receipts naming the builder, the engine and gearbox specification, the paint code and the dates of major work. Magazine features and show history support a period-build claim only if they name or picture this car, identifiably. An undocumented car is not a bad car, but it must be priced as the car you inspected, not as the car in the story.
- Decide what the car is, then price that car. Write down, before you negotiate, which of the categories from the models section this example honestly occupies — documented period build, traditional build, contemporary custom or mild hot rod — and list the faults you found in the order of the problem areas: structure, custom work, mechanicals, cosmetics. If the structure and the chop are sound, almost everything else is fixable at a knowable price. If either is unsound, walk away, however good the photographs were. On a Mercury Custom you are buying the builder's workmanship as much as Mercury's car — and workmanship is the one thing you cannot retrofit cheaply.
Values
Read the market for a Mercury Custom differently from the market for almost any standard classic, because there is no standard car to anchor it. The computed market block beneath this guide — the cars listed now and the recorded sales the site has gathered — is your starting point, but on this model it needs more interpretation than usual, and the small pool behind this guide is a warning in itself: with so few cars passing through at any one time, a single exceptional sale or a single optimistic advertisement can make the figures look like a trend when they are only an event. Use the block to see what is being asked and what has actually changed hands, then do the real valuation work on the individual car in front of you.
The condition spread is wider here than for a restored Mercury Eight, and it is driven less by mileage or originality than by the quality and coherence of the build. At the bottom sit project cars and tired old customs: cars whose filler is cracking, whose chop was never well finished, whose engines are tired and whose documentation is a story. These are worth what the base car and the reusable parts are worth, minus what it will cost to undo the work — and undoing is real work, so a poor custom is often worth less than the standard car it began as. In the middle sit sound, attractive, honestly presented builds with no particular provenance: the bulk of the market, and the cars whose prices move most with presentation, season and how urgently the seller needs the space. At the top sit two kinds of car that buyers conflate at their peril — documented period builds with genuine history, and fresh, professionally built contemporary customs whose cost of construction is evidenced by receipts. Both command strong money, but for different reasons, and each is a poor substitute for the other. A buyer who wants history will not be satisfied by a fresh build, however flawless, and a buyer who wants modern usability will not be consoled by provenance when the car overheats in traffic.
Variant premiums follow coherence rather than rarity. The post-war coupé carries the strongest and most consistent demand because it is the icon — the shape buyers picture when they hear the words lead sled — and a well-proportioned coupé chop with a tasteful grille, a sound engine and a traditional finish will always find an audience. Convertibles of either generation attract a premium when their tops work and their structures are sound, and lose it quickly when they do not, because the faults are expensive and the buyers know it. Pre-war cars occupy a narrower, more discerning market: fewer buyers, but buyers who value correctness of detail and quality of brightwork. Monterey-badged bases, period overhead-valve installations and documented magazine or show history all add interest, and all add value only when evidenced — a claim without paperwork is a conversation, not a premium. Modern mechanical specification adds value in proportion to its usability rather than its cost: an overdrive automatic, effective cooling, disc brakes and air conditioning that work make a car saleable to people who intend to drive it, while extreme performance hardware in a car built for cruising tends to return only a fraction of its cost.
Negotiate on evidence and be specific. “The rear pillar filler is cracking, the overdrive does not engage and there is no build documentation” is a position; “it is not worth that to me” is an opinion the seller can simply wait out. Customs are emotional purchases and sellers are often the builders, or the people who commissioned the build, so expect the first conversation to be partly about the car's story. Listen to the story — it may contain real provenance — then return, politely and repeatedly, to the car you inspected and the sales the market has recorded.
Parts and ownership
Owning a Mercury Custom means running two supply chains at once. The first is the standard Mercury and Ford world, which is comparatively well served. The second is the custom world, where the part you need may have been made once, by hand, for this car. Plan for both, and keep records as though you will one day have to prove to a buyer — or to your own mechanic, at midnight, with the car on stands — what everything is.
For the base car, the picture is encouraging. Flathead Ford and Mercury engines are supported by a deep specialist trade in North America: gaskets, bearings, pistons, water pumps, ignition parts, carburettor kits and complete rebuilt components are available from established flathead specialists, and the knowledge base — manuals, forums, club technical advice — is extensive. Mechanical parts shared with Ford practice of the period, including much of the brake, steering and suspension hardware, are correspondingly easier than the Mercury badge might suggest. Post-war body and trim parts are harder: Mercury-specific panels, grille pieces, lamp assemblies and brightwork were made in smaller numbers than Ford equivalents, are reproduced selectively and otherwise come from donor cars and old stock. Pre-war parts are harder still, and convertible-specific items — hood frames, header rails, bracing, top hydraulics or linkages where fitted — can become a search measured in months. Before you buy, price the two or three items the car already needs, by actually asking suppliers, rather than assuming availability.
Custom body parts are the true ownership commitment. A chopped windscreen, cut side glass, a rear window borrowed from another model, a DeSoto grille in a Mercury opening, one-off bumpers and hand-made panels cannot be reordered. Protect what you have: keep glass templates if the builder supplies them, record the donor model for every substituted component you can identify, photograph mountings and brackets during any work, and never throw away a removed custom part until its replacement has been fitted and driven. Paint deserves the same discipline — record the paint manufacturer, colour code and, if it is a custom mix, the formula and the painter. A later blend for a small repair is straightforward with the formula and a matter of trial, error and visible mismatch without it.
Which one to buy
There is no best Mercury Custom in the abstract — there is only the build that matches what you intend to do with it, executed well enough that you spend your time driving rather than correcting. Choose by use first, then by generation, then by the individual car's workmanship.
- The traditionalist: a 1949–51 coupé, moderately chopped, nosed and decked, with its 255 flathead rebuilt and cooling properly sorted, drum brakes in first-class order and a Borg-Warner overdrive if you can find one. This is the car the whole culture is about, and in sound condition it is also a genuinely usable classic — provided you accept flathead pace and flathead cooling discipline as part of the pleasure.
- The long-distance driver: a post-war coupé or sedan with a documented modern swap — a small-block or LS V8, an overdrive automatic, an upgraded radiator with an electric fan, disc front brakes and, ideally, air conditioning that works. You lose period purity and gain a car that will cross a state in summer without negotiation. Pay for the quality of the installation, not for the length of the specification list.
- The pre-war romantic: the 1940 Eight convertible, like the green car in our pool, with its upright grille and separate wings intact, a healthy 239 flathead, a sound hood and brightwork you will not have to rechrome immediately. This is the most elegant Mercury custom of all and the least forgiving of structural tiredness, so let the scuttle, floor and door fit decide, not the showroom shine.
- The historian: a documented period build — chopped in the 1950s, photographed in period, featured or shown with evidence that identifies this car — even if its specification is mild and its needs are real. Provenance of that quality cannot be manufactured later, and it is the one form of value in this market that survives changes in taste. Verify it ruthlessly; an unverified story is not this car.
- The value buy: a sound, undocumented traditional build in an unfashionable colour or with a mild specification — unchopped or lightly chopped, flathead-powered, honestly presented by a seller who prices the car rather than the money spent. The market undervalues coherence it cannot categorise, and a straight, well-kept car of this kind is where the driving pleasure per unit of money is highest.
- The car to avoid, whatever the label: any example, of any generation, whose roof, pillars or floors fail the inspection in this guide — thick filler over corrosion, a chop that binds its glass and sags its doors, a clip or notch welded by optimism. Engines can be rebuilt, gearboxes exchanged and paint renewed on a schedule you can plan. Structure and geometry are the car.
The overriding rule: buy the workmanship, not the silhouette — a Mercury Custom is only ever as good as the hands that cut it, and a sound, honest build in the style you will actually use beats a dramatic car with a story every time.
See the 1 Convertible Hot Rod Custom cars currently listed.
For sale now
 $149,000 · 193% above typical
Expand
What they sell for: Convertible Hot Rod Custom sale prices.